Making our first viking age shield

The preparation of our first shield was a long process. It took a lot of studying and this is a version Arttu was most interested in building. The preference was to make as light and agile a shield as possible. It is made of radially cut spruce. The boss is made of gnarl, the handle is ash, and the raw hide is deer. The planks are 6 mm thick in the middle of the shield and about 3 mm thick on the edge.
The board
Radially cut planks were a huge problem and we made some ourselves, but those turned out just a bit too thin and ended up becoming scabbards instead. We managed to buy radially cut planks from Fiskarssin saha. These enabled Arttu to make the board.
 |
| Originally tried from pine |
 |
| Self made planks came 3-5 mm thick :( |
 |
| From Fiskarssin saha (Finnish company) |
 |
| After using a circular saw |
Then there was some simple gluing with hide glue.
 |
| Clamps.... |
...and oh.. the GLUE... That we didn't try to make first, but bought from Plektra. It comes as "grains" that need melting. The one we bought was made of hide, typical of viking age crafts. Below you also see a plane and a board sawn round...


...Arttu made the board too thin on one edge, but was lucky since that edge was only in one of the blanks. The thing that is great about animal glues is that they have to be melted below 75 degrees Celsius or the proteins brake, and then the glue doesn't work anymore. So with cooked water Arttu was able to melt the glue on the blank and replace the too thin plank to a new one. |
The Hide
We first tried to make the hide ourselves from a sheep and that was one stinky business.


And then we got one good hide, but it was just a bit too small for the shield so we bought one instead. (This time we won't mention the place, since we ordered more and the second order failed.) The one we ordered was 90 cm wide very thin rawhide. Seller said it's for drum making.
Gluing the hide
Since the board was likely going to bend to the side where the glue is, Arttu first put a lot of glue to the side of the board where there was not going to be a hide. waited a day (or two, don't remember) and then glued the hide.


In the first picture you can see how much the board bends from adding glue to the other side. In the second you see bad planning on how the clamps were used. After this the board looked different every day for some days.


It finally found a form that was bent quite a lot to the side of the hide. The following picture shows attaching the ash handle and re-gluing the hide to the edge. (Before this the boss was glued.) The gluing of the handle made the shield almost straight.

The Boss
Wooden boss interested us for many reasons and we wanted to make one. The gnarl was a gift, so we don't know what type of tree it is made of. Carving it to the right shape took days. Below you can entertain yourself by watching a video about testing the ready made boss.
The reason to make the umbo of gnarl is that it does not split. There is a finding of this kind in Latvia. 


We wish to state that it's a lot easier to make one from modern steel than to carve one from this stuff. Arttu attached this one and the handle with glue only. The idea is to see how well it holds. When they break off we will test sewing them to the board with rawhide string. But right know the whole shield is kept together only by the hide glue.
It's this thing. (Not this particular, but a similar thing.)

The handle was made out of an ash plank and glued to the board after some shaping.

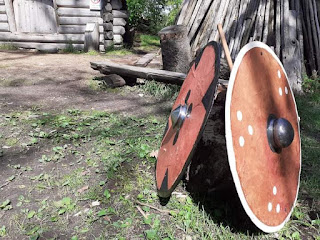
The finished product


And most importantly, a video of Arttu using it while playing slowed game against Julle with sharps.
The detailed information on why the shield is like this and weight + other specific things are not yet available but we have some estimates. The shield is 85 cm in diameter and weights less than 2 kg. (Between 1 and 1,5 kg, Arttu thinks. We don't have a good enough draw scale to measure it). The Boss is about 1 cm thick. You can ask about this stuff in comments or on Hirdmenn's Facebook page.
EDIT: This shield is few years old today (2/9/21) and we wrote a new post about it. Go check it here.
If you want to learn more about shield making, here are two sources:
Making an authentic viking shield by Roland Warzecha (part1)
And about authentic viking shields (they finished making 1)
...and the shield they made.
Then there is this amazing Facebook post from Bartosz Ligocki
ps. there is more in the making. (Someone should clean their workshop.)

Nice work! For what it's worth, for my shields, I use rawhide drum heads, calfskin from Pakistan, which comes in rounds 91.5 cm in diameter, and quite thin (0.5mm or so). I also have found that if you put on both front and back hides at once after soaking the hide, compressing the laminate with 100-150kg salt bags evenly between two melamine or plywood boards (I use wax paper to keep the hide/shield from adhering to the compression boards), the tendency for the thing to turn into a "pringle" is eliminated.
ReplyDeleteReally cool advice. My own experience now is that if we glue the hide to both sides inside 30 minutes the end results becomes really nice. (Doesn't help if I want show my cool cut planks, by leaving the other side without hide.) I also now think it is probably a mistake to glue the front hide over the edge, because I feel it ads to the turning into "pringle" effect. -Arttu
Delete